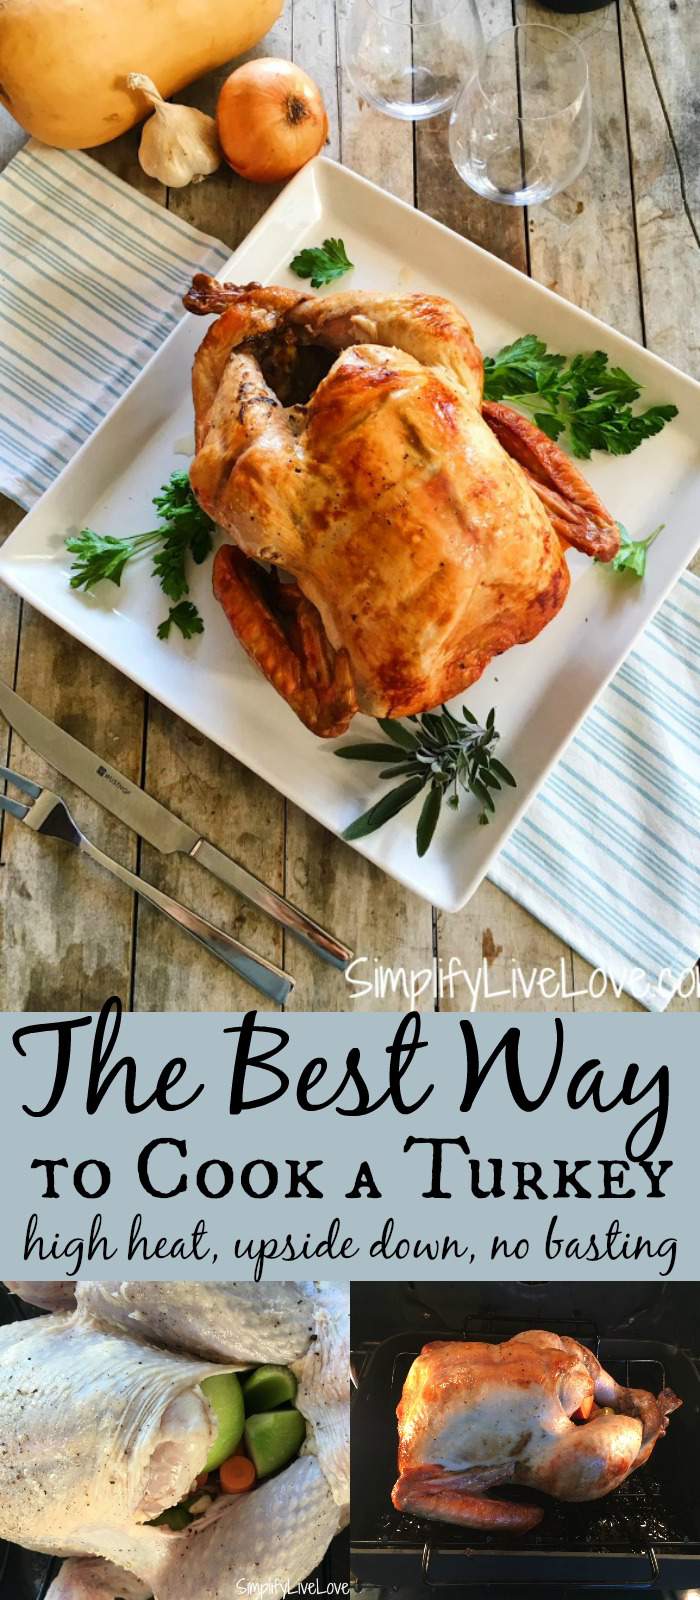
Why the Best Way to Cook a Turkey is Upside Down (High Heat Recipe)
on Sep 27, 2023, Updated Oct 27, 2023
This post may contain affiliate links. Please read our disclosure policy.
By doing everything wrong over the years, I’ve found the best way to cook a turkey is to toss out everything you may have heard about the “right” things to do. High heat, upside down, no basting. These are the step by step secrets to the best turkey you’ll ever eat whether you like white or dark meat. Keep reading to learn more!

Table of Contents
- Benefits of Cooking a Turkey Upside Down
- Why the Best Roast Turkey is Cooked Upside Down (High Heat Recipe)
- Now that you’ve done that, here’s the best way to cook a turkey!
- Tips & Tricks – How to Bake a Turkey Upside Down
- Best Way to Cook a Turkey Printable Directions
- Best Way to Cook a Turkey – upside down, high heat, no basting! Recipe
Benefits of Cooking a Turkey Upside Down
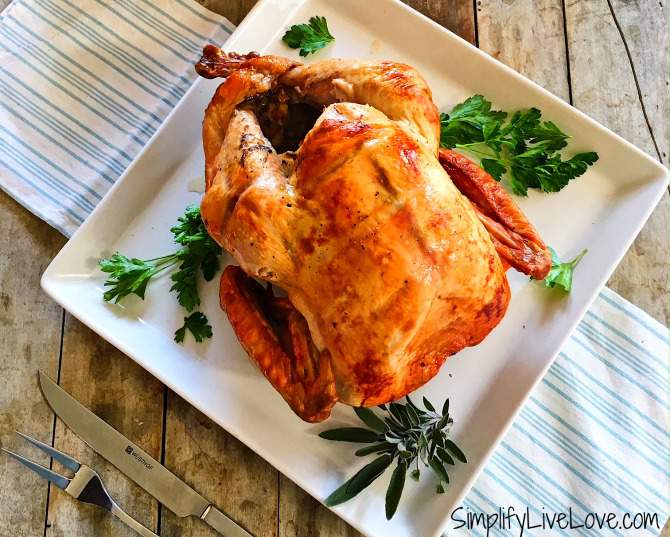
If you want a delicious, crispy skinned turkey with divine meat, the best way to cook it is to start upside down, using high heat, and no basting. Bonus! Your turkey will cook quicker too.
In full disclosure, I learned this completely by accident. The first year I cooked the turkey for our huge family thanksgiving meal, I accidentally cooked it upside down. It was embarrassing at first because everyone laughed when they saw it. There are lots of benefits of upside cooking, but an instagram worthy looking turkey isn’t one of them!
However, when our crew tasted the meat, it was immediately clear that cooking the turkey upside resulted in a better product. Here are more benefits to cooking the turkey upside down:
- No basting! No cooking a turkey upside downs means it is a self-basting turkey! No more slaving a away all day basting your turkey.
- Turkeys cooked upside down using a high-heat recipe cook faster and also more evenly!
- The turkey from a turkey cooked upside is the moistest, juiciest turkey meat ever. I promise!
- There’s no need to brine. Absolutely none. This easy turkey recipe speaks for itself. Save yourself so much time by not brining your turkey!
Pin this now to find it later
Pin ItWhy the Best Roast Turkey is Cooked Upside Down (High Heat Recipe)
I’m sharing all the embarrassing tips and tricks I’ve learned along the way about cooking turkeys. I know this information might be shocking, but the best way to cook a turkey is not low and slow, breast side up. It does not require basting. (It doesn’t even require washing and patting the turkey dry, you guys!) These out-of-date methods make a dry and yucky turkey for your beautiful Thanksgiving table.
This recipe is without a doubt, the best Thanksgiving Turkey Recipe! Of course, it’s also a great recipe for any time you need the perfect roast turkey – Christmas, Easter, or any other time you would like to have leftover turkey to add to your freezer!
1. COMPLETELY THAW your frozen turkey
- 12-16 pounders need 3-4 days to thaw. (Put in fridge on Sunday or Monday BEFORE Thanksgiving.)
- 16-20 pounders need 4-5 days to thaw. (Put in fridge on Saturday or Sunday BEFORE Thanksgiving.)
- 20-24 pounders need 5-6 days to thaw. (Put in fridge on Friday or Saturday BEFORE Thanksgiving.)
2. Bring your turkey to room temperature.
Take the turkey out of the fridge an hour before you want to roast it. It should come to room temperature before cooking. That takes about an hour for most whole turkeys.
3. Do not rinse your turkey.
This goes counter to what many people think, but according to the USDA, “Wash your hands, but not the turkey! Many consumers think that washing their turkey will remove bacteria and make it safer. However, it’s virtually impossible to wash bacteria off the bird. Instead, juices that splash during washing can transfer bacteria onto the surfaces of your kitchen, other foods and utensils.”
4. Remove all innards (neck & giblet)!! You might laugh… but not everyone knows to do this.
5. Cut off all plastic pieces on the bird – ties holding legs together and the pop up timer. That dumb plastic timer doesn’t work anyway so get rid of it before cooking your turkey.
Now that you’ve done that, here’s the best way to cook a turkey!
Remove all extra racks in the oven, leaving only one in the lowest position. Pre-heat oven to 500 degrees a half hour before cooking time. Double and triple check that you have removed the turkey neck and bag of giblets, cut off any plastic ties that may be holding the legs together, and removed the pop up thermometer, if there is one.

Carefully, separate the skin from the turkey and spread melted butter inside the turkey under the skin. Then, brush the outside of the turkey with the remaining butter and season to taste with salt and black pepper. A silicone basting brush makes it easy to rub butter. If you don’t want to use butter, feel free to use oil. It’s your call.
You should also tie the legs together around the turkey with kitchen twine instead of inserting them in the skin as pictured above. That way all the skin comes out brown and lovely lovely. When you insert the legs into the skin as in the picture, the turkey skin portion that is covered turns out mushy and not that nice.
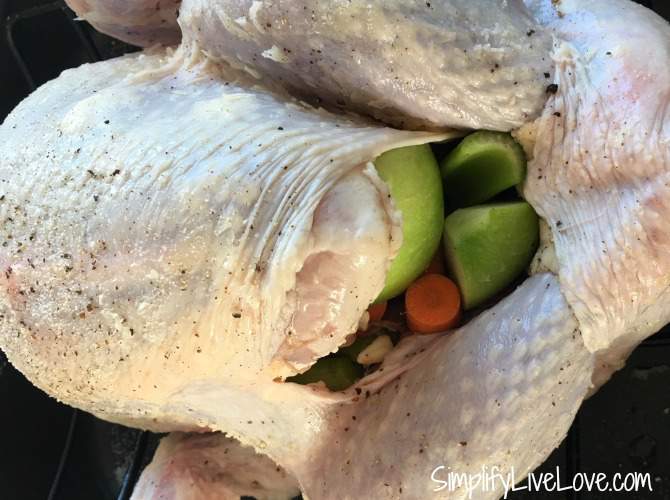
Place all vegetables and apple chunks in the cavity of the turkey.
Tips & Tricks – How to Bake a Turkey Upside Down
I promise, you will love the moist turkey you end up with when you follow this easy turkey recipe!

Place turkey breast side DOWN in a large roasting pan. We use a roasting rack to keep the turkey up out of the drippings. I forget to take a picture after I put it in the pan, so refer to the picture above for proper breast side DOWN position.
Tuck the wing tips under the bottom of the turkey so they don’t burn. Put cold water in the bottom of the roasting pan (around the bird but not over it). You don’t want to wash away the butter or seasoning.
Start the turkey roasting on the lowest oven rack in a preheated oven at 500 degrees for 30 minutes. Then, turn the oven down to 350 and cook for 1 1/2 more hours (without opening the oven). Turn the oven light on and check from time to time to make sure the turkey is not browning too much. If it is, loosely tent the turkey with foil.
Every time you open the oven door, your turkey dries out a little more. That’s why basting does more harm than good. So really resist opening that door if you can help it.

How to Flip the Turkey
After the turkey has cooked for about 2 hours, take it out of the oven. Using silicone oven mittens, flip the bird breast side up so the breast can brown nicely. Now it’s time to insert the oven-safe remote thermometer in the thigh, without touching the bone.
How Long to Roast the Turkey
Make sure the wings are tucked underneath so they don’t burn. Cook the turkey for 45 minutes to one hour longer, or however long it takes for the internal temperature to reach 165 degrees in the thickest part of the thigh. Also check the thickest part of the breast meat too. (Just to reiterate, the turkey in the above picture is breast side UP).
The biggest question people have when roading a turkey is how long to cook it. The total cooking time ranges from 2 3/4 hours to 3 1/2 hours for a 12- 16 pound turkey. Add about 13 minutes more for each additional pound if your turkey is over 16 pounds.
If you don’t have an oven safe thermometer, you can use the stick variety too. Just realize that every time you open the oven to check the turkey, it’ll dry out the meat a little bit more. 🙁

Finally, when the turkey is fully cooked, remove from oven. Loosely tent with foil and let turkey rest for at least 30 minutes before carving. This is very important!! Don’t slice it on the cutting board for at least a half an hour.
While the turkey is resting, use the pan drippings in the bottom of the roasting pan and make a delicious turkey gravy. Homemade gravy is actually really easy. Here’s all you need:
- 4 tablespoons meat drippings
- 1/4 cup all purpose flour
- 2 cups stock, use a high quality stock – homemade is best
- Salt and pepper to taste
Get the full recipe + troubleshooting tips: How to Make Gravy
Kitchen tools that make cooking a turkey very easy
While you don’t have to have all of these kitchen tools to cook your Thanksgiving turkey, they will make the process easier. Here’s what we recommend to get the best roast turkey!
- silicone basting brush
- kitchen twine
- silicone oven mittens
- Digital meat thermometer
- large roasting pan
- aluminum foil
Would you like a free printable Thanksgiving Planner?
If you’re feeling overwhelmed this year, let my printable Thanksgiving planner help you simplify Thanksgiving Day! Including checklists, menus, timelines and more, this free printable will help you organize for the most successful Thanksgiving Dinner ever!
What other Side Dishes to Serve for a Delicious Turkey Dinner?
Instant Pot Mashed Potatoes to Make Ahead & Freeze
How to Make Perfect Turkey Gravy
Sourdough Stuffing Recipe with Roasted Red Onion, Kale, and Sausage
Delicious Sourdough Dinner Rolls Made with Sourdough Discard
Waste Not, Want Not – Recipes that Use Left-Over Turkey
In our opinion, turkey leftovers are one of the best parts of a holiday meal. Here are a few ways to make the most of your leftovers!
How to Make Turkey Pot Pie from Scratch
Sweet Potato Gnocchi with Turkey & Mushroom Cream Sauce
Where to Buy a Local Whole Turkey
Now that you know how to cook the turkey, you need to get that turkey! If you’re wondering where to buy a turkey, why not consider ordering a local turkey from an independent family farm?
Here are a few places to find a turkey from an independent family farm:
- 99 Counties – locally sourced, regeneratively farmed meat delivered to your door! Available in Chicagoland and anyone within 100 miles of Keystone, Iowa
- ChopLocal – support local farms and small butcher shops by buying meat grown and processed in the US
- Butcher Box – offers seasonal turkeys that are raised and processed in the US too.
No, you should not cook a turkey in a plastic bag. Besides the fact that we think bags are unnecessary and toxic, they are also another type of single-use plastic you just don’t need. Proponents of cooking turkeys in bags think it’s the best way to cook faster and get moister meat, but this upside down, no-baste turkey recipe proves you don’t need one.
If you’re wondering how to tuck the turkey wings, don’t worry! It’s easy to tuck turkey wings. In this recipe, you will tuck the wings underneath the turkey back after you flip your turkey over. Just hold the back up a bit so you can get the wings underneath it. Now you’re good to go!
It’s easy to freeze leftover turkey meat. Wrap turkey slices tightly in freezer paper, then put it all in an airtight container. We love reusable Stasher bags! Use a straw to get all the air out to prevent freezer burn. Label the bag and freeze for up to 6 months.
Best Way to Cook a Turkey Printable Directions
Best Way to Cook a Turkey – upside down, high heat, no basting!
The best way to cook a turkey! High heat, upside, no basting!
Ingredients
- 1 12-16 pound turkey
- 1 carrot, chunked
- 1 stalk celery, chunked
- 1 onion, quartered
- 1 green apple, quartered
- 1/4 cup melted butter
- salt & pepper to taste
- ½ C. water
Instructions
- Heat oven to 500 degrees.
- Remove the turkey neck and bag of giblets. Cut off any plastic ties that may be holding the legs together. Remove the pop up thermometer, if there is one.
- Place all your vegetables in the turkey cavity.
- Carefully, separate the skin from the turkey and rub half the butter under the skin.
- Rub the outside of the turkey with the remaining butter.
- Season to taste with salt and pepper.
- Place turkey breast side DOWN in a roasting pan.
- Put water in pan around the bird but not over it.
- Cook turkey at 500 degrees for 30 minutes, turn oven down to 350 and cook for 1 1/2 more hours.
- After the turkey has cooked for about 2 hours, remove from oven, carefully flip over so the turkey is now breast side UP. Insert a remote safe oven thermometer in the thigh, without touching the bone and continue cooking until the meat thermometer reads 165 degrees.
- Remove turkey from oven, cover loosely with foil and let rest for 30 minutes before serving.
- Carve & Enjoy!
Notes
Add about 13 minutes cooking time per additional pound of turkey over 16 pounds.
Nutrition Information:
Yield:
32Serving Size:
1/2 pound per personAmount Per Serving: Calories: 446Total Fat: 18gSaturated Fat: 6gTrans Fat: 0gUnsaturated Fat: 11gCholesterol: 251mgSodium: 256mgCarbohydrates: 1gFiber: 0gSugar: 1gProtein: 65g
Nutritional data is not always correct.


Hello Michelle I loved the flavors and juiciness of our turkey when we backed it upside down. It was a few years ago when our family tried it this was. Since then we experimented with several ways from deep fried to burring it in a pit with coals. This year we thought to try the upside down method again but our family won’t all be together this year. We opt for a nine pound turkey. What are your suggestions for time to cook in the oven. We want to avoid opening the oven as much as possible.
I did this today and it turned out great. The breast meat was nice and moist. However I didn’t have any silicone mitts so I didn’t turn it over as suggested. It still turned out great but the skin on the breast was not appetizing. It was just the two of us so a good time to try out a new way of doing things.
Hello,
I want to cook the turkey breast side down. Where do you put the butter under the skin if it is upside down, won’t it just drip down into the pan instead of into the breast meat?
It shouldn’t drip down, but if some does, it will just make the drippings for gravy better! 🙂
Can I stuff the turkey using this method?
Hi Arlene, I have never tried so I don’t really know. Maybe add the stuffing after flipping? I don’t know long it takes stuffing to cook in a turkey – so that would be my only concern. Good luck!
Arlene –
I’ve never tried this breast-side down method before, but figured I’d give it a shot! I stuffed my 22-pounder just before putting it in the oven (get yourself some turkey stuffing bags – I’ve used these before and they ROCK … it makes getting the stuffing out a breeze!)
I always make extra stuffing because I find stuffing outside the bird to be too dry, and inside (even though it soaks up all those wonderful flavors) its almost too wet. So, when the turkey comes out of the oven, I remove the stuffing, mix it with an equal amount of extra prepared stuffing, and then just bake it while the turkey rests. This way I am also certain its safe (no one has ever gotten sick from my stuffing – like NOT EVER!)
OMG !!! The best Turkey ever !!
I’ve been cooking at least one Turkey a year for over 40 years and your upside down method far out weighted any other recipe!!!!
ALL parts of the Turkey most importantly the breast were moist and cooked to perfection!!! I’m spreading the word !!
I’m so glad you liked it! <3 Happy Thanksgiving to you!
Hi. Yesterday,I cooked a turkey exactly per your instructions. I’m sad to say that although the turkey skin was crisp, the rest of the turkey was dry. Even the dark meat was dry. I let it rest for a half hour after cooking as you suggested. My turkey was 11 pounds. Maybe it was too small to cook within the time frames you listed.
It cooked for 2 hours upside down, then 30 minutes after being flipped. Oh well. I’ll try your method again one day as this does seem like a practical way to a moisture turkey.
@Gwendolyn, I really want to try this and I don’t have a lot of experience so I want to get it right. Did you turn the temp down after 30 minutes or did you cook it at 500 for two hours?
You really need to turn the heat down if you don’t want to char your turkey! 🙂
Superb. I love that I do a blasting of 500 degree, turn down to 350, and with oven thermomter in just let it go until the breast is 170. I don’t have to worry about “timing” anything. Also, when the breast was 170, that dark meat (as it’s higher) was 180. Honestly, perfect in ever fashion. Even the next day the turkey was all moist. Compliments everywhere from this method.
I have not told my mom yet but her turkey is dry. lol. this is the only way to cook turkey. I do this every year now. the best part is the thigh skin is brown and tasty and not mushy
This method was so simple! 17 lb turkey was perfect with just the 2 hrs (vs other recipes that say 3 hrs). Will try again but flip little earlier to get the skin on the breast side a better color (perhaps to match the beautifully browned underside).
The recipe nor pictures show that a foil covering has been used during cooking. Do you cook the turkey without the loosely placed foil?