The Simple Apple Pie Filling That Freezes (and Cans) Beautifully
on Sep 24, 2025
This post may contain affiliate links. Please read our disclosure policy.
Here’s an easy apple pie filling recipe to freeze or can – we’ll teach you how to do both! If you have an abundance of apples from a backyard tree or the local apple orchard, turn them into this delicious homemade apple pie filling!
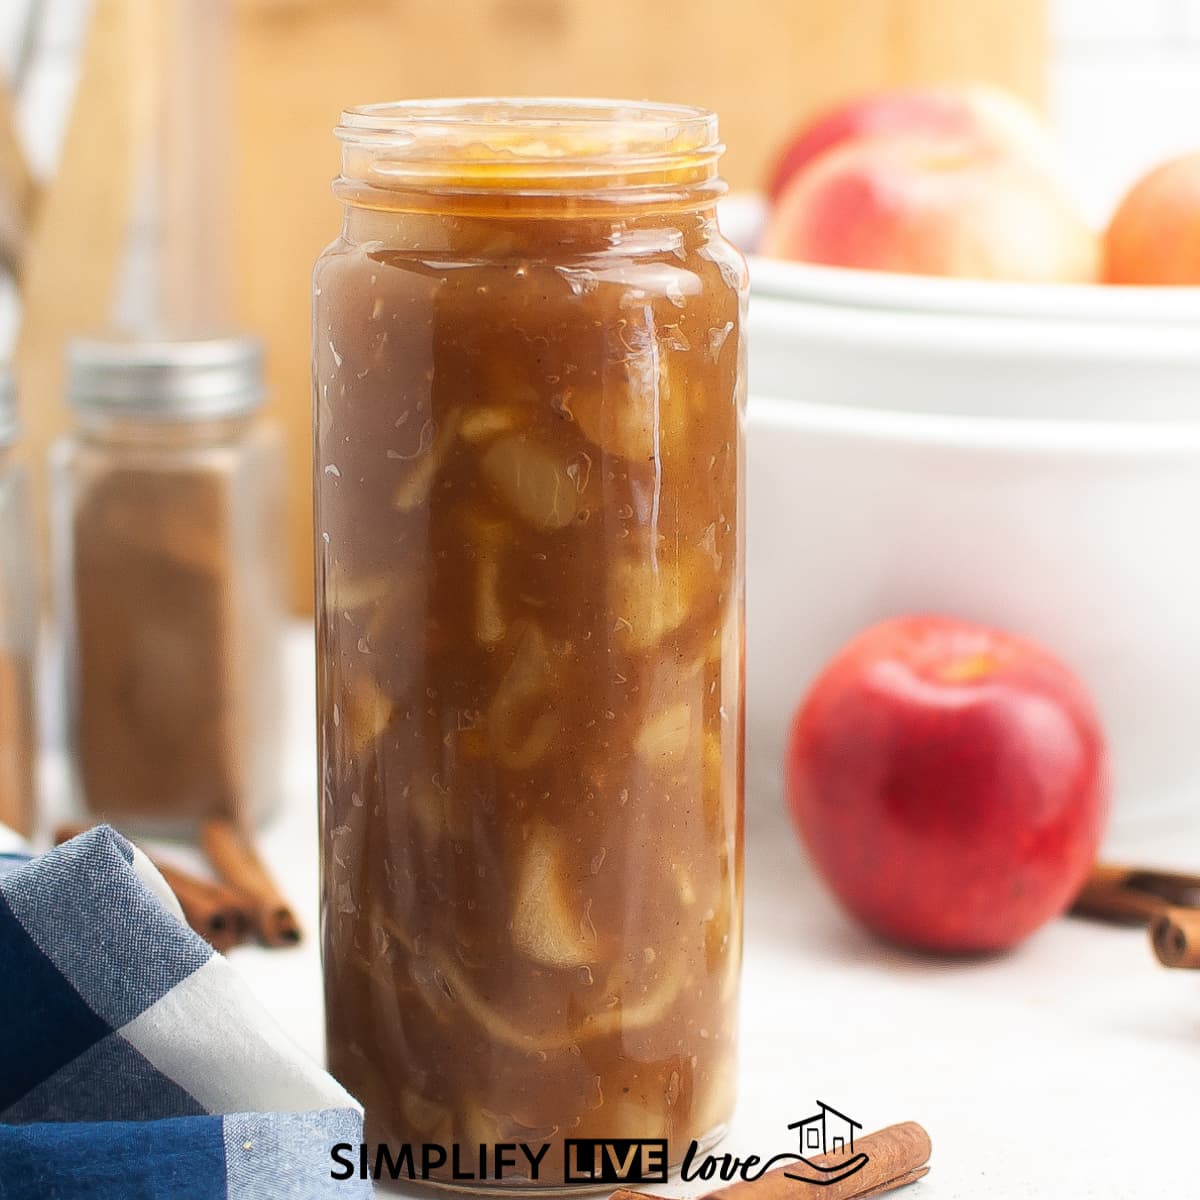
Is there anything more quintessential in fall than homemade apple pie? Save time in your pie baking endeavors by pre-cooking your apple pie filling and then freezing or canning to use another day. What a great way to preserve your apple harvest for eating all year.
Table of contents
If you’re trying to decide how best to put up apples from your orchard or local farmers, let us help! Freezing apple pie filling is very easy but may take up too much room in your freezer. Canning apple pie filling takes a bit more work, but makes up for the effort by being shelf stable.
Which type of preserving method you choose depends on your needs and storage space. Regardless, this homemade apple pie filling recipe that you make ahead of time makes pie baking quicker and easier! Plus, it can be used for so much more than pies! Having this pre-cooked apple pie filling on hand makes a great topping on German Pancakes, Eggnog Waffles, Buttermilk Pancakes and so much more.
Pin this now to find it later
Pin ItLooking for other ways to preserve an abundance of apples? We recommend scrap apple jelly, dehydrated apple rings, and homemade applesauce too.
Now, let’s get busy making homemade apple pie filling to freeze or can.

What’s in this Homemade Apple Pie Recipe for Freezing?
Apples – Make sure to choose fresh, crisp apples for the best texture and flavor.
Packed brown sugar – For a warm, caramel-like sweetness and a hint of molasses flavor. Choose dark brown sugar if you want more of that molasses flavor, or light brown sugar if you don’t/
Sugar – You can use normal granulated sugar to sweeten and help preserve the color and texture of the apples. I often use raw sugar though. It’s slightly less refined than granulated sugar and retains some of the natural molasses, which gives it a slight caramel flavor and a pale brown color. It does change the sweetness level of the apple pie filling though because raw sugar is slightly less sweet than granulated sugar.
Ground cinnamon – For the best flavor, choose Ceylon Cinnamon which is known for its classic taste and potential health benefits, such as anti-inflammatory and antioxidant properties.
Apple Pie Spice – Apple pie spice is a blend of warming spices like cinnamon, nutmeg, and allspice, enriching the flavor profile and enhancing the spiced character of the pie filling.
Salt – Our favorite salt to use in all recipes is Redmond’s REAL Salt. It’s a natural sea salt sourced from an ancient salt deposit located in Redmond, Utah. We like it because it is unrefined, all-natural, super pure, and contains trace minerals.
Cornstarch – Cornstarch is one possible thickening agent you’ll need to keep the filling from being too runny when baked or used.
Apple cider vinegar – ACV aids in preservation and contributes a mild tangy flavor and acidity to the filling, which balances the sweetness of the apples. Our favorite apple cider vinegar is Bragg’s.
Pro Tip: If you don’t want to use cornstarch, arrowroot powder will work fine in this recipe too. If you plan to can the recipe, you will need to use canning approved Clear Jell Liquid Pectin instead of the cornstarch as cornstarch is not a canning safe ingredient.

Variations on this Freezer Apple Pie Filling Recipe
Here are a few of the creative variations you can take on this apple pie filling recipe for freezing:
Instead of using apple pie spice, you could use pumpkin pie spice instead. You’ll get a lsighlty different spice profile if you use pumpkin pie spice instead of apple pie spice.
Use a combination of different apple varieties instead of only one type, A combination of sweet and tart apples can make a more complex flavor profile.
For a unique spin, add a pinch of salt and a hint of black pepper to create a savory apple pie filling that pairs well with meats and cheeses.
Choose apples with a balance of sweet and tart flavors, such as Granny Smith, Honeycrisp, or a mix of varieties for a well-rounded flavor.
Yes, it’s recommended to peel the apples for a smoother, uniform texture in your pie.
Pre-cooking isn’t necessary, but it can help soften the apples if you prefer a quicker baking time when you make your homemade apple pie.

How to Freeze Homemade Apple Pie Filling
It’s easy to freeze this homemade apple pie filling. All you have to do is let the mixture cool to room temperature, portion it into freezer safe containers, and freeze. If frozen correctly, it should last for 9-12 months in the freezer. Once your apple pie filling is ready, allow it to cool to room temperature.
Our Favorite Reusable Freezer Safe Containers
You have a lot of options when it comes to freezer-safe containers. We used to use plastic ziplock freezer bags for the job, but prefer reusable, sustainable containers. Here are a few reusable containers you can use for freezing apple pie filling:

Souper Cubes Freezing Trays
We love Souper Cubes because they allow you to freeze things like homemade broth, soups, beans, and this apple pie filling in pre-measured portions. The two-cup tray is our favorite and it gets the most use. The individual compartments ensure easy portioning, and their airtight seal prevents freezer burn and maintains the quality of your foods.
To use them, pour the filling in the trays, cover the trays with their lids, and place them in the freezer until the filling is soli. After that, transfer the frozen cubes to a freezer-safe bag or container for long-term storage.
When you’re ready to bake a pie, just pop out the required number of cubes, and your homemade apple pie filling will be ready to use in no time. It’s a practical and space-saving method that ensures you have a stash of delicious, ready-to-use filling for pies and other desserts at your convenience.
Stasher Silicone Bags
Another favorite reusable container for freezing foods are Stasher silicone bags. Stasher bags are versatile and reusable bags with airtight seals. They’re great for storing soup, sauces, fruits, or leftovers, Stasher bags keep your food fresh and protected from freezer burn. Like souper cubes, they can be used over and over again, reducing the need for single-use plastic bags and if you get the right size, you can even store the lovely frozen cubes inside these bags.
Mason Jars
We also like to use Mason Jars for freezing food as well. However, it’s super important to leave extra headspace to allow for expansion when freezing in jars. If you don’t leave enough headspace, the jars can crack and ruin your hard work. You’ll also want to use plastic lids when you use Mason jars for freezing.
Considerations for Canning Apple Pie Filling
If you want to can this recipe, I recommend one important change. Cornstarch is no longer a canning safe product because it causing uneven thickening which can cause your jars to explode. Instead of using cornstarch, you’ll need to use Sure Jell Liquid Fruit Pectin if you want to can this recipe.
So make recipe as shared, but replace Liquid Pectin with the cornstarch. To can apple pie filling, follow these canning instructions:
Canning Instructions
- Clean and sterilize your jars by washing them in hot, soapy water, rinse them well, and then boiling them in a pot of water for about 15 minutes. (Make sure the jars are completely dry before filling them.)
- Ladle hot filling into your jars. It’s important to leave about 1/4 inch of headspace at the top of the jar. This will allow the filling to expand as it cools following the sealing process.
- After filling jars, wipe off any excess filling from the rims with a clean, damp cloth to ensure a tight seal.
- Place the lids on the jars, ensuring they are centered and flat. Twist on the screw bands until they are “fingertip” tight. You don’t want to over-tighten the lids, air needs to be able to escape during the canning process.
- Place the filled jars back into the boiling water bath, ensuring they are covered with at least one inch of water. Boil pint jars 15 minutes, and boil quart jars for 25 minutes. Add 2 minutes of boiling time per 1,000 feet above sea level.
- Once the jars have finished processing, remove them from the water using a jar lifter and allow them to cool on a towel or rack for about 24 hours. Once cooled, check to ensure each jar has sealed properly by pressing on the center of the lid – if it pops up, it has not sealed and should be refrigerated and used first.
- Store the jars in a cool, dry place and let them set for about two weeks before using. This allows the flavors to develop. Your apple pie filling should keep for up to a year when stored properly.

How to Use Homemade Filling to Bake an Apple Pie
To use this homemade filling to bake your pie, you’ll need your favorite 9″ double pie crust and 4 cups of filling – exactly what this recipe yields. If your filling is frozen, thaw before using, then bake according to pie directions. Serve a la mode with a scoop of vanilla ice cream, or with a dollop of homemade whipped cream and enjoy!
More Apple Recipes We Love
Glazed Apple Fritter Cookie Bites
Apple & Pear Scones made with Whole Grains
Homemade Apple Pie Filling Recipe

Homemade Apple Pie Filling Recipe
Equipment
Ingredients
- 2 tablespoons butter, unsalted
- 5 large apples, peeled, cored, and thinly sliced
- ¾ cup brown sugar packed
- ¼ cup granulated sugar
- 1 teaspoon ground cinnamon
- 1 teaspoon apple pie spice or pumpkin pie spice
- ⅛ teaspoon salt
- 6 tablespoons cornstarch
- 2 ½ cups water
- 2 teaspoons apple cider vinegar
Instructions
- Peel, core, and slice apples. An apple-peeler-corer slicer makes quick work of this task.

- Then, add the butter and apple slices to a large sauce skillet. Sauté the apples until they are tender, 10 minutes.
- Add the sugars and spices and continue to sauté until the sugars have dissolved and simmering.

- Add the cornstarch to water and vinegar and whisk until cornstarch has dissolved.
- Add the wet mixture to the apples and gently stir to mix. Bring to a simmer and allow the filling to thicken.

- Once you have reached the desired thickness, remove from the heat and let cool before canning or storing. If you are using it immediately, let cool slightly before using it.


I’m going to try your recipes for the pie filling for the freezer. thanks for sharing your knowledge.