Ukrainian Egg Decorating: A Beginner’s Guide to Pysanky
on Mar 31, 2026
This post may contain affiliate links. Please read our disclosure policy.
Ukrainian egg decorating — known as Pysanky — is one of the most stunning Easter traditions in the world. These intricate eggs carry centuries of symbolism, culture, and craft. They are unlike anything you can pick up from a store-bought kit, and once you try making one, you will never look back.
I first discovered Pysanky when a friend introduced me to the art after years of me being underwhelmed by the cheap egg decorating kits available here. Having grown up in Germany, where elaborately decorated Easter eggs hung on beautiful branches long before the holiday arrived, I had long been nostalgic for truly beautiful eggs. Ukrainian egg decorating to the rescue.
Whether you are exploring your Ukrainian heritage, looking for a meaningful family Easter activity, or simply want to create something beautiful, this beginner’s guide to Ukrainian egg decorating will walk you through everything you need to know.
Table of Contents
- What Is Ukrainian Egg Decorating (Pysanky)?
- Symbolism in Ukrainian Egg Decorating
- Materials and Tools for Ukrainian Egg Decorating (Pysanky)
- ⚠️ Safety First
- How to Make Ukrainian Easter Eggs: Step-by-Step
- 💡 Beginner Tip
- How to Store Your Ukrainian Pysanky Eggs
- Frequently Asked Questions About Ukrainian Egg Decorating
- Ready to Try Ukrainian Egg Decorating?
- More Easter Posts You’ll Love
What Is Ukrainian Egg Decorating (Pysanky)?
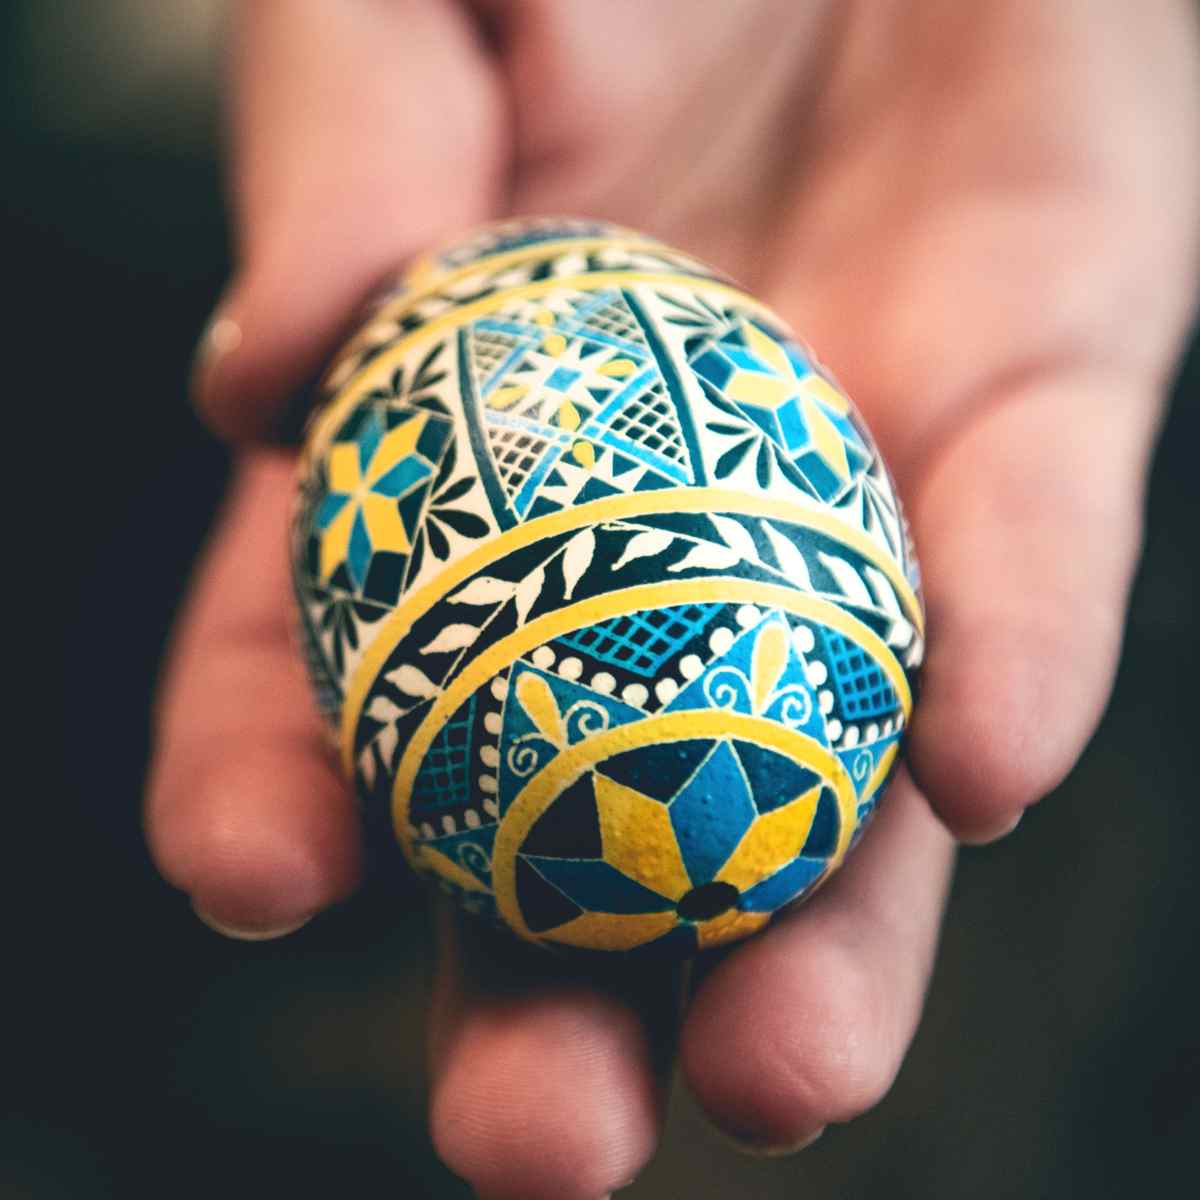
Pysanky are Ukrainian Easter eggs decorated using a wax-resist method, similar in principle to batik fabric dyeing. The word comes from the Ukrainian verb pysaty, meaning “to write” — because the designs are literally written onto the egg with wax, not painted.
Eggs have held deep symbolic meaning since before recorded history, representing fertility, life, and renewal. Even in pre-Christian Ukraine, elaborately decorated eggs were exchanged as gifts in spring. With the Christianization of Ukraine, the symbols evolved to carry religious meaning as well — with motifs representing the Holy Trinity, the Virgin Mary, and the resurrection of Christ.
The process involves using a small funnel-tipped tool called a kistka to apply melted beeswax onto the eggshell in intricate patterns. The egg is then dipped into dye. Because wax repels the dye, only the unwaxed areas take on color. By layering wax and dye repeatedly — from lightest to darkest colors — the artist builds up a complex, multi-colored design. At the very end, the wax is melted away to reveal the finished egg underneath.
The result is breathtaking. Ukrainian egg decorating blends art, tradition, and what feels like a little bit of magic.
Symbolism in Ukrainian Egg Decorating
One of the things that sets Pysanky apart from other egg decorating traditions is the rich symbolism embedded in every design. Traditional symbols carry specific meanings, and understanding them adds a whole new layer of depth to the craft. Here are some of the most common symbols and what they represent:
| Symbol | Meaning |
| Sun / Stars | Life, warmth, and good fortune |
| Wheat / Plants | Harvest, prosperity, and abundance |
| Fish | Christianity, health, and fertility |
| Birds | Fulfillment of wishes and a good harvest |
| Horses | Strength, speed, and endurance |
| Spirals | Immortality and the mystery of life and death |
| Triangles | The Holy Trinity — Father, Son, and Holy Spirit |
| Dots | Stars, the Virgin Mary’s tears, or fertility |
Colors also carry meaning in traditional Ukrainian egg decorating. Red symbolizes life and passion; black represents the earth and eternity; yellow stands for light and purity; green signifies growth and fertility; and white represents purity and innocence.
As a beginner, you do not need to follow traditional symbolism strictly — but knowing these meanings can inspire your design choices and connect you to a centuries-old tradition.
Materials and Tools for Ukrainian Egg Decorating (Pysanky)
Creating Pysanky at home is more accessible than it looks. Here is everything you will need to get started:
⚠️ Safety First
Adult supervision is required for this craft. You will be working with open candle flames and hot wax. Tie back long hair before you begin — learn from my daughter’s experience at our very first session! Use a stable, fire-safe surface for your candle at all times.
Eggs
Start with fresh, clean chicken eggs. Both raw and blown-out (emptied) eggs will work for Ukrainian egg decorating. Raw eggs are easier to handle and rotate during the process. They will gradually dry out over time once decorated. Blown-out eggs take more prep work but will last indefinitely. If making eggs to keep for years, blown-out is the better choice.
Beeswax
Beeswax is the traditional choice for Pysanky. It has a low melting point, applies smoothly, and adheres well to the eggshell. Purchase it in block form from craft stores or online. Specialty Pysanky beeswax often contains carbon black to make it easier to see on the egg — a useful option for beginners.
Kistka (Wax Applicator Tool)
The kistka is the most important tool of Ukrainian egg decorating. It is a small funnel-tipped instrument used to pick up melted beeswax and draw it onto the eggshell. Kistky come in multiple sizes — fine tip for thin lines and intricate details, medium for standard lines, and heavy for filling in larger areas. Consider buying a set with multiple sizes to give yourself design flexibility.
Pin this now to find it later
Pin ItEgg Dyes
Use specialized Pysanky egg dyes or food coloring for bright, vibrant results. Traditional Pysanky feature red, yellow, black, and white, but modern practitioners use the full color spectrum. You can also make natural dyes from foods like beets (pink/red), turmeric (yellow), red cabbage (blue/purple), and spinach (green) if you prefer a chemical-free approach.
Small Candle
A small taper candle or tea light candle is used to melt the beeswax into the kistka and to melt the wax off the finished egg. Keep your candle in a stable holder on a fireproof surface throughout the process.
Pencil
Use a light pencil to sketch your design onto the eggshell before you begin applying wax. This is especially helpful for beginners — it ensures your design is balanced and symmetrical, and that you have room for all the elements you want to include.
Tissues or Soft Cloth
Use these to wipe away excess wax and dye during the process. Inexpensive store-brand tissues actually work better here than soft, lotion-infused ones — the texture helps remove residue more cleanly.
Drying Rack or Egg Carton
A drying rack or open egg carton allows your decorated eggs to sit safely without smudging while the dye sets.

How to Make Ukrainian Easter Eggs: Step-by-Step
Follow these steps for your first Ukrainian egg decorating experience. Remember: true Pysanky artisans spend years honing this craft. The goal for beginners is creativity and expression — not perfection. Enjoy the process.
- Prepare your workspace. Gather all materials and lay them out on a well-lit table. Make sure your eggs are clean, dry, and at room temperature. Cold eggs can cause condensation, which interferes with wax adhesion and dye absorption.
- Sketch your design. Lightly pencil your design onto the eggshell. Divide the egg into sections first — halves, quarters, or eighths — as a guide. Sketching ensures symmetry and gives you a roadmap to follow when applying the wax.
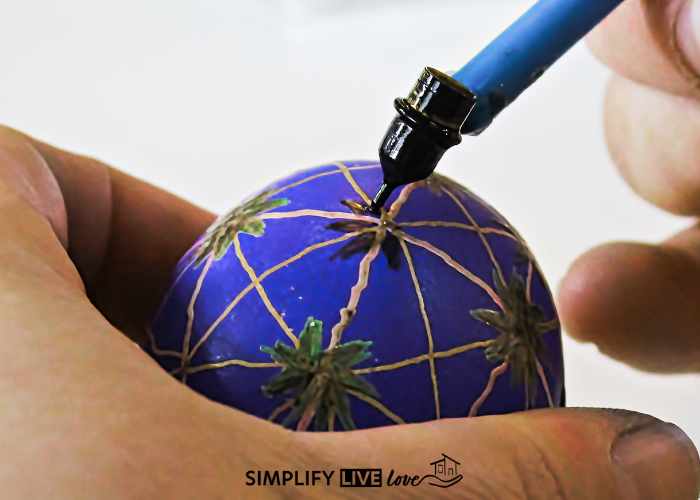
- Apply the first layer of wax. Heat your kistka over the candle flame until it is warm enough to melt the beeswax. Draw the kistka across your beeswax block to load it with wax, then use it to trace over the areas of your design that you want to remain WHITE. The wax acts as a barrier and will protect those areas from the first dye.
- Dip into the lightest dye color. Submerge the egg in your lightest dye (typically yellow) and allow it to set according to the dye instructions, usually a few minutes. Remove the egg and allow it to dry completely.
- Apply the second layer of wax. Now cover all areas you want to remain the FIRST dye color. These sections will be protected from the next dye layer.
- Dip into the next color. Continue to the next dye, which should be slightly darker than the first. Allow to set and dry.
- Repeat the wax-and-dye process. Continue alternating wax application and dyeing, always moving from lighter to darker colors. Each layer of wax preserves the color beneath it.
- Apply the final (darkest) dye. The last dye is typically the darkest color in your design — often black, dark red, or navy. This becomes the dominant background color of the finished egg.
- Melt away the wax. Hold your egg close to (but not touching) the candle flame to gently warm and soften the wax. As it melts, wipe it away with a soft tissue. Work in sections. The gorgeous multi-colored design underneath will be revealed as you go — this is the most magical moment of the entire process.
- Place on a drying rack. Set your finished egg on a rack or in an open egg carton to dry fully before handling.
💡 Beginner Tip
Start with a simple geometric design — stripes, diamonds, or divided color fields — before attempting intricate traditional motifs. Your first egg probably will not look exactly like your vision, and that is completely normal. Each egg teaches you something new.
How to Store Your Ukrainian Pysanky Eggs
Proper storage keeps your Ukrainian egg decorating efforts beautiful for years to come. Here are the key things to know:
- Use paper egg cartons, not Styrofoam. Paper allows the eggs to breathe as they slowly dry out, which prevents cracking.
- Store them in open air. Avoid keeping eggs sealed tightly in a cabinet or box — air circulation is important for raw eggs.
- Keep out of direct sunlight. UV light fades the vibrant dye colors over time. A display shelf away from windows is ideal.
- Handle gently. Discourage people from picking up or shaking the eggs frequently. Raw eggs become lighter and more fragile as they dry, and excessive handling can disturb the finish or crack the shell.
- For long-term display, consider blown-out eggs. If you want heirloom-quality Pysanky that last for decades, the extra effort of blowing out the egg before decorating is well worth it.

Frequently Asked Questions About Ukrainian Egg Decorating
What is a kistka used for in Ukrainian egg decorating?
A kistka is the small, funnel-tipped metal tool used to apply melted beeswax onto the eggshell in the Pysanky process. You heat the metal tip over a candle flame, load it with beeswax from a block, and then use it to draw lines and patterns onto the egg. Wherever wax is applied, the dye cannot penetrate — which is how the layered color designs are built up.
Can kids do Ukrainian egg decorating?
Yes, with proper adult supervision. The craft involves open flames and hot wax, so it is not recommended for very young children on their own. Children who are old enough to handle a pencil carefully and follow safety instructions can participate meaningfully — and they love the reveal moment when the wax is melted off. Set expectations that their first egg is about learning, not perfection.
How long do Pysanky eggs last?
Raw Pysanky eggs will gradually dry out over months to years as the contents evaporate through the porous shell. Stored properly — in open air, away from direct sunlight, and handled gently — they can last for many years. Blown-out Pysanky eggs, with the contents removed before decorating, can last indefinitely and are often kept as heirlooms.
What do the symbols on Ukrainian Easter eggs mean?
Traditional Pysanky symbols carry rich meaning rooted in both pre-Christian and Christian Ukrainian culture. Common symbols include the sun (life and warmth), fish (health and Christianity), wheat (prosperity), birds (fulfillment of wishes), and spirals (immortality). Colors also carry symbolism — red for passion and life, black for eternity, yellow for light, and green for growth. See the symbol table earlier in this article for a full overview.
Do I need special dyes for Pysanky?
Specialized Pysanky dyes give the most vivid, traditional results and are worth purchasing for your first project. However, you can use standard food coloring mixed into a vinegar-water solution, or make natural dyes from plants and spices. Natural dyes produce softer, more muted tones that have their own beauty — especially for earthy, traditional-looking eggs.
Ready to Try Ukrainian Egg Decorating?
Ukrainian egg decorating is one of those crafts that is simple enough to try on your first attempt, yet deep enough to spend a lifetime mastering. Whether you follow traditional Pysanky symbolism or develop your own unique designs, each egg you make connects you to a rich cultural tradition spanning centuries.
Gather your materials, set up your workspace, and embrace the imperfection of learning something new. Your first Pysanky egg is waiting to be made.
More Easter Posts You’ll Love
- Hop Into Spring: 9 Healthy Easter Basket Ideas
- Fun and Affordable: Best Easter Basket Ideas for Teens
- How to Grow Wheat Grass at Home in 5 Days


Very neat. Where do you by the Ukrainian kit?
Okay, silly me. First of all it's buy and next just saw your link on where to purchase them.
There's a link to one in the Amazon bar INSIDE my post – it's at Hearth Song. There's another one at Magic Cabin. I haven't actually bought one yet. I think both catalogs above sell the exact same kit. I have shopped both places and am always pleased with my purchases.
Beautiful eggs the kids made! I'm really sorry now that we didn't make it like I had planned!
I buy my ukrainian egg stuff from http://www.yevshan.com/main.asp which might be more expensive than amazon as I didn't compare but I like their stuff a lot.
I am so delighted you had fun! I did too!
My daughter just asked the other day when it was time to decorate eggs. I've never heard of ukrainian egg decorating. I have always bought the paws boxes. I'll have to to look into this.
Thanks, Kristia