How to Check for Ticks: A Step-by-Step Guide for Humans, Kids & Pets
on May 27, 2026, Updated Jun 22, 2026
This post may contain affiliate links. Please read our disclosure policy.
Tick, tick, tick… Hear that? It’s the sound of nature’s hitchhikers, waiting to latch onto unsuspecting explorers like you and your furry pals. Learning how to check for ticks is one of the most important things you can do to keep your family and pets healthy — and 2026 is shaping up to be a bad year to skip it.
According to Johns Hopkins Bloomberg School of Public Health, emergency department visits for tick bites were up more than 25% in April 2026 compared to the same time last year — an early sign of a challenging tick season ahead. Ticks can spread serious diseases like Lyme disease, Rocky Mountain spotted fever, and anaplasmosis. The CDC estimates that up to 476,000 people are diagnosed and treated for Lyme disease every year in the United States, and cases have been rising steadily for decades as ticks expand their range due to climate change.
The good news? A thorough tick check takes only a few minutes and could make all the difference. Here’s exactly how to do it.

Tick Check Quick Reference
Here’s the quick version of everything you need to know about checking for ticks:
- 🕐 Come indoors within 2 hours of outdoor activity and change your clothes immediately
- 🔍 Check warm, moist spots — behind the knees, armpits, groin, belly button, hairline, and behind the ears
- 👧 For kids, pay extra attention to the scalp and back of the neck — have them change clothes every time
- 🐾 For pets, check the ears, neck, between the toes, groin, and under the tail before letting them back inside
- 🚿 Shower within 2 hours — it helps wash off unattached ticks and makes checking easier
- 🧺 Toss clothes in the dryer on high heat for 10 minutes — washing alone won’t kill ticks
Already found one? Read our guide on what to do if you’re bitten by a tick for next steps.
Table of Contents

What You Need: Assemble a Tick Kit
Before anything else, put together a simple tick kit so you’re always prepared. Keep it in a small bag near your door or in your hiking pack.
Here’s what to include:
- A magnifying glass — nymphal ticks can be as small as a poppy seed. A magnifying glass makes them much easier to spot.
- Fine-tipped tweezers or a Tick Key — this Tick Key is a specially designed removal tool that helps you extract the entire tick, including the head, without squeezing the body.
- Alcohol swabs — to clean the bite area after removal. Soap and water also work.
- Tick identification card — helps you identify the species, which matters for medical decisions.
- A Sharpie — to circle and mark the bite area so you can monitor whether it spreads.
- Small zip-lock bags — to save the tick for testing if needed.
If you’d like to buy a preassembled tick kit instead of making your own, here are a couple of good choices:
Premium Tick Remover Kit – Stainless Steel Tick Remover + Tweezers, Leather Case, and Free Pocket Tick Identification Card (1 Set)
Tick Removal Tool & Twister Kit for Dogs, Cats & Humans

How to Check Yourself for Ticks: Step by Step
Timing matters. The CDC recommends showering within two hours of coming indoors, which helps wash off unattached ticks and gives you a good opportunity to do a thorough check.
Step 1: Come indoors and undress within 2 hours of outdoor activity.
Step 2: Put your clothes directly into the dryer on high heat for 10 minutes before washing. Heat kills ticks that may be hiding in seams and fabric. Washing alone — especially in cold water — is not enough.
Step 3: Shower if possible. Showering within two hours has been shown to reduce the risk of Lyme disease. It also makes it easier to do a full-body check.
Step 4: Do a full-body inspection, working from your feet upward. Ticks prefer warm, moist areas. Check all of the following:
- Between the toes and on the feet
- Behind the knees
- The inner thighs and groin area
- Around the waistband
- The belly button
- Under the arms and in the armpits
- Around and behind the ears
- Along the hairline and neck
Step 5: Check your scalp. Run your fingers through your hair slowly, feeling for small bumps. Use a comb to part sections if you have thick or long hair. A handheld mirror helps if you’re checking alone.
Step 6: Check areas you can’t see. Ask a spouse, partner, or older child to check your back and buttocks. If no one is available, use two mirrors.
Pro tip: Small nymphal ticks (the most common transmitters of Lyme disease) are about the size of a poppy seed or grain of pepper. Don’t rely on feeling alone — look carefully, especially in skin folds.

How to Check Your Kids for Ticks
Children are more likely to brush through tall grass, roll in leaves, and crawl under bushes — all prime tick territory. Check them thoroughly every time they come in from playing outside.
Follow the same step-by-step process as adults, but pay extra attention to:
- The scalp — kids love tumbling and rolling, and ticks can get deep in thick hair
- Behind the ears
- The back of the neck
- Between the fingers and toes
After every outdoor outing, have your kids change clothes completely. Pop the old clothes straight into the dryer on high heat for 10 minutes.
Age-Specific Tips
Teens: Remind them that ticks don’t always cause immediate irritation — they can feed for days without being noticed.
Toddlers and young kids: Turn the tick check into a game. Call it a “bug hunt” and let them help check their own arms and legs. This builds awareness early.
School-age kids: Teach them the key hiding spots. When they understand why ticks hide in warm, dark places, they’re more likely to check themselves independently as they get older.
Where Do Ticks Hide on the Body?
Ticks gravitate toward areas where blood vessels are close to the skin’s surface and the environment is warm and slightly moist. The most common places to find ticks on humans are:
- The scalp and hairline
- Behind and around the ears
- The neck
- The armpits
- The waistline and belly button area
- The groin and inner thighs
- Behind the knees
- Between the fingers and toes
The most commonly missed spots are the belly button, between the toes, and the groin — don’t skip these.
How to Check Pets for Ticks
Our pets get ticks and are susceptible to tick-borne diseases just like humans. Doing a pet tick check can be a little bit complicated because of all their fur. Again, just make it a habit to go over your pet’s skin on a regular basis after frolicking around outside.
How to Check Your Pets for Ticks
Our pets are just as vulnerable to tick-borne diseases as we are — sometimes more so, since they can’t tell us something is wrong. According to the CDC, tick-borne diseases can take 7–21 days to appear in pets, and by then a tick may have long since dropped off. That’s why routine checks after every outdoor session matter.
Where Do Ticks Hide on Dogs and Cats?
Ticks on pets tend to cluster where fur is thinner and blood vessels are accessible. Focus on these areas:
- In and around the ears (including inside the ear flap)
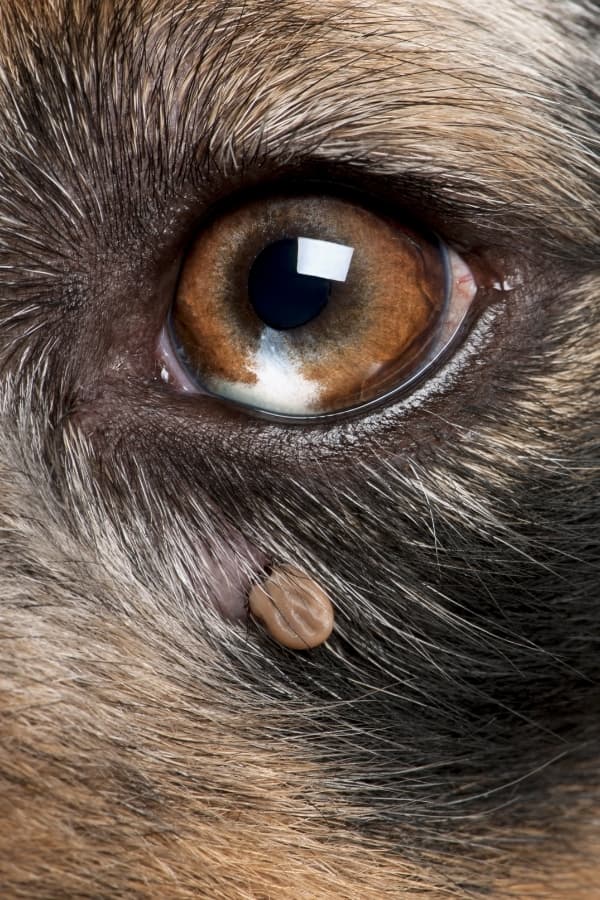
- Around the eyes and eyebrow area
- Under the collar
- Around the neck
- Between the toes and under the paws
- In the groin area
- Between the front legs (the “armpit” area)
- Around and under the tail
How to Do a Pet Tick Check
- Run your fingers slowly through your pet’s coat, feeling for small bumps on the skin. Part the fur with your fingers to see the skin beneath.
- Use a fine-toothed flea comb or tick comb to work through longer-coated breeds more thoroughly.
- Check the face carefully — around the eyes and muzzle — as ticks on dogs often attach here.
- Lift the ears and check inside the ear flap and just inside the ear canal opening.
- Check between every toe on all four paws.
- Look under the tail and around the base of the tail.
As ticks feed, they become engorged and change from dark brown to a lighter grayish-brown color. An engorged tick on a dog can be as large as a small grape and is often mistaken for a skin tag. If you find a bump you didn’t notice before, look closely.
Always check your pets before they come back inside to avoid transporting ticks into your home.

How to Remove a Tick Safely
Found one? Don’t panic. The key is to remove it promptly and correctly.
- Use fine-tipped tweezers or a Tick Key. Grasp the tick as close to the skin’s surface as possible.
- Pull upward with steady, even pressure. Do not twist or jerk — this can cause the mouthparts to break off and remain in the skin.
- Do not squeeze the tick’s body. Crushing it can push fluids into the bite, increasing disease risk.
- Do not use petroleum jelly, nail polish, or heat to make the tick “back out.” These methods are ineffective and may increase the risk of infection.
- After removal, clean the area with rubbing alcohol or soap and water.
- Save the tick in a sealed bag or jar with a small piece of damp paper towel. Note the date. If you develop symptoms, you can have it tested.
- Mark the bite site with a Sharpie and monitor for redness or a rash expanding outward.
If you are unable to remove the tick cleanly, or if you are uncomfortable doing so, contact a healthcare provider or veterinarian.
What to Do After a Tick Bite
After removing a tick, monitor the bite site and your overall health closely for 30 days.
See a doctor promptly if you notice any of the following:
- A bullseye-shaped rash (erythema migrans) — a classic sign of Lyme disease
- Any expanding redness around the bite site
- Fever, chills, or flu-like symptoms
- Headache, fatigue, or muscle aches
- Joint pain or swelling
Not every tick bite causes illness, and not every tick carries disease — but symptoms can appear anywhere from 3 to 30 days after a bite, so it’s important to stay alert.
For pets, watch for lethargy, loss of appetite, swollen joints, or fever. Contact your vet if your pet seems unwell after a known or suspected tick exposure.
Pin this now to find it later
Pin ItFrequently Asked Questions about Checking for Ticks
Check for ticks every time you or your children spend time outdoors, particularly in wooded areas, tall grass, or leaf litter. This includes backyard play, hiking, gardening, and camping. Also check shoes, backpacks, and jackets before bringing them inside.
An unengorged tick looks like a small dark brown or black speck — similar to a small freckle, scab, or dirt. Nymphal ticks are about the size of a poppy seed. Adult ticks are larger, roughly the size of an apple seed. After feeding, ticks swell and lighten in color, sometimes appearing grayish or greenish-brown.
For Lyme disease, a black-legged tick (deer tick) generally needs to be attached for 36–48 hours to transmit the bacteria. This is why early detection and removal is so important. A tick found and removed within 24 hours dramatically lowers your risk.
Most tick species don’t survive long indoors because of low humidity. However, the American dog tick and brown dog tick can survive and even reproduce indoors. If you suspect ticks in your home, vacuum thoroughly and consult a pest control professional. Washing bedding and pet bedding regularly also helps.
The CDC recommends DEET (up to 30%) for children over 2 months old, applied by adults (not by the child). Picaridin is another effective, lower-irritation option. For clothing, permethrin-treated garments provide long-lasting protection and are safe for kids. Natural alternatives like oil of lemon eucalyptus (OLE) are effective but should not be used on children under 3.
Signs of infection include increasing redness, warmth, swelling, or pus around the bite site. A bullseye rash — a red ring expanding outward from the bite — indicates possible Lyme disease. Fever, fatigue, and muscle aches in the days or weeks following a bite are also reasons to seek medical care. When in doubt, contact your doctor.
If the mouthparts break off during removal, use clean tweezers to try to remove the remaining pieces. If you can’t, leave it alone and allow the skin to heal — the body will typically expel the remnants over time. Clean the area thoroughly and monitor for signs of infection. Contact a healthcare provider if you have concerns.
Tick Prevention: Your First Line of Defense
The best tick check is the one you don’t need to do because you prevented the bite in the first place. Before heading outdoors:
- Wear light-colored clothing so ticks are easier to spot
- Tuck pants into socks when hiking in wooded or grassy areas
- Stay on the center of trails and avoid brushing against vegetation
- Apply insect repellent — DEET or picaridin for skin, permethrin for clothing and gear
- Check for natural prevention options like natural ways to prevent tick bites
And if you do get bitten, read our full guide on what to do if you’re bitten by a tick for next steps.