Delicious Sourdough Bread Recipe w Sample Timelines & Tips for Success
on May 22, 2020, Updated Feb 02, 2025
This post may contain affiliate links. Please read our disclosure policy.
This sourdough bread recipe with timelines and tips for success will help you make the most beautiful and delicious sourdough bread in no time at all! If you have been frustrated by complicated sourdough recipes, this one is for you!
Delicious Sourdough Bread Recipe with Sample Timelines & Tips for Success
Table of Contents
- Delicious Sourdough Bread Recipe with Sample Timelines & Tips for Success
- Helpful Supplies that Make this Sourdough Bread Recipe Easier
- Sample Baking Timelines
- Simple & Delicious Sourdough Step by Step Bread Recipe
- Shaping and final rise
- How to slash or score the bread
- The ins and outs of baking sourdough bread!
- Simple & Delicious Sourdough Bread Recipe Recipe
When I first started baking sourdough, I was a little overwhelmed with all the steps and the time involved to Bake a delicious loaf of bread. It’s really an art form!
Sourdough doesn’t have to be intimidating though! This post will spell out all the details in an easy to understand manner and give you tried and true tips for success. After baking sourdough bread for over a year and making every single mistake there is to make, you will appreciate the helpful nature of this post.
To make your sourdough bread baking experience easier, I do recommend a few products. Having the right tools just makes the job easier and makes your bread look more beautiful and professional. If you’re new to baking sourdough bread, I don’t recommend buying everything immediately. Bake a few loaves first and make sure you enjoy it.
That said, I would recommend that you get an electric food scale right away as the success of you loaf depends on the accuracy of your measurements. A dutch oven is also very useful to help you get the lovely sourdough crust. Here’s a list of sourdough tools that I recommend if you really start to enjoy baking sourdough.

Helpful Supplies that Make this Sourdough Bread Recipe Easier
Digital scale – This is the one item that I recommend you buy before you start to bake sourdough, if you don’t have one. Everything else can wait, but the scale is very important.
Plastic proofing container – These come in very handy for the initial bread rising stages. You can use any bowl you like, but these containers with lids are very handy.
Dough scraper – If you’re making multiple loaves at once, a dough scraper will come in very handy to slice the dough. I’ve had my scraper for almost as long as I’ve had my mixer (16 years?). It’s very useful for bread baking.
Wooden Spoon or silicone spatula – Using metal is not recommended for sourdough because it reacts with the acid in the starter. Make sure you have wooden or silicone spoons / spatulas on hand.
Banneton Proofing Baskets – Banneton baskets are nice to have, but not necessary. If you like the way the lines look on sourdough breads, these proofing baskets are the way to get them. You can proof your bread in a towel lined bowl though if you won’t care about the lines.
I have four proofing baskets of various shapes and sizes and love them all. If you’re looking for a basket, all you need is the basket and the liner. They’re often sold in kits with a lot of other items (like a lame) but most of those items are cheap gimmicks and not effective.
Bread Lame – This is a razor blade with a handle. If you want to score your bread and make pretty designs you will need some sort of lame. Since holding razor blades makes me nervous, I like the one with the handle.
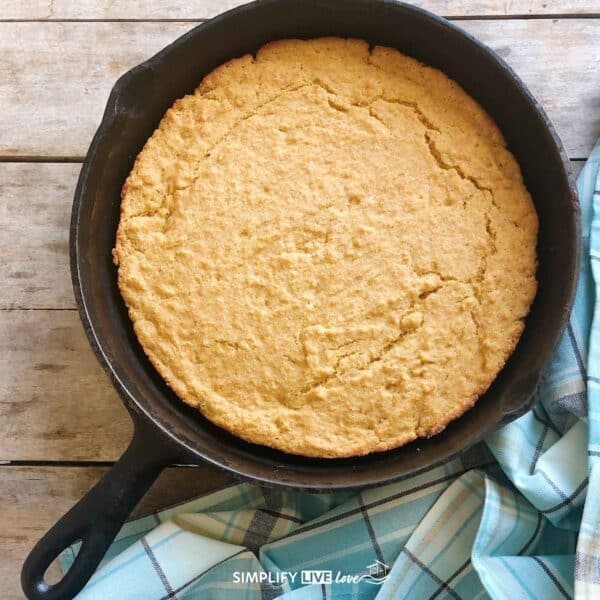
Baking Stone – You can achieve a nice crusty loaf of bread by baking on stone and creating a faux steam with water in a cast iron skillet. More on that later.
Parchment Paper – parchment paper comes in handy for lining a dutch oven (which I rarely do) or for cooking on a stone (which I do!). It makes transferring the dough to the oven easier.
Heavy duty mixer – I have been using my BOSCH mixer for over 16 years. It’s an older version of the one linked here, but it is a fabulous mixer. It has a much more powerful motor than another popular stand mixer and is able to knead 5 loaves of bread in 5 minutes. If you’re in the market for a new mixer, I can’t recommend a bosch mixer enough. You don’t have to have a mixer, but I have found that using a mixer makes it really easy!

Sample Baking Timelines
Sourdough baking involves lots of different steps and can turn into an all day on-again-off-again process. Here are a couple of timelines to help you decide on a last feeding time based on when you’d like to bake.
Need tips for your starter? This post will tell you everything you need to know about feeding sourdough starter including, how to store it, how to maintain it, and trouble shooting as well. Remember, your starter needs to be doubled in volume before it’s ready to bake. A strong starter is the biggest key to your success.
Timeline #1 – Evening Feeding for Early Afternoon Baking
Feed starter for the last time the night before. 9:00 pm – 10:00 pm
8:00 am, mix the dough, then allow to rest AUTOLYSE
8:20 am, add salt
9:20 am, letter fold #1
10:20 am, divide dough
10:40 am, shape dough and place in proofing basket
12:00 pm, preheat oven
Right before baking – slash the bread
12:40 – 1:00 pm – bake
Timeline #2 – Morning Feeding for Evening Baking
Feed starter for the last time in the morning. 7:30 am – 8:30 am
3:00 pm, mix the dough, then allow to rest AUTOLYSE
3:20 pm, add salt
4:20 pm, letter fold #1
5:20 pm, divide dough
5:40 pm, shape dough and place in proofing basket
7:00 pm, preheat oven
Right before baking – slash the bread
7:40 – 8:00 pm – bake

Simple & Delicious Sourdough Step by Step Bread Recipe
Whew – that was a lot! Are you ready to start baking? Here’s what to do! Note: these pictures feature a double batch of the sourdough bread recipe I am sharing below. If you follow the recipe as written, you will have half as much dough as is featured in many of my pictures.
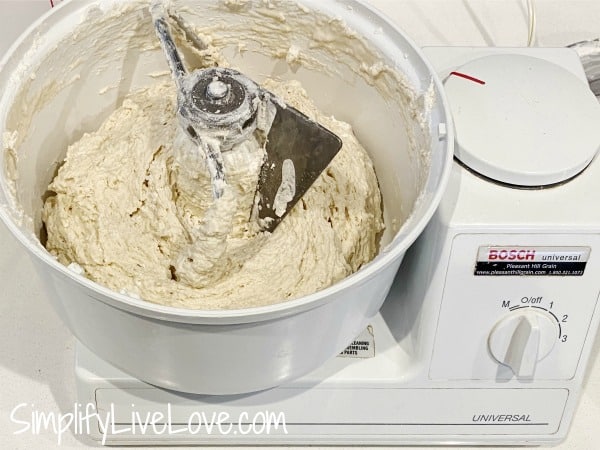
The first step is to measure out starter, water, and flour and mix ingredients using a stand mixer. I find it most helpful to use a scale to measure these first ingredients. Mix on low speed only until a shaggy dough forms, about 1-2 minutes. Leave the dough in the mixer, cover, and let it rest for 20 minutes. This resting is called the autolyse and during it, the flour absorbs the water which starts the gluten making process.

After twenty minutes, add the salt. Turn on the mixer and knead the dough on low speed for 3-4 minutes. The dough will still be pretty soft and sticky when it’s done.
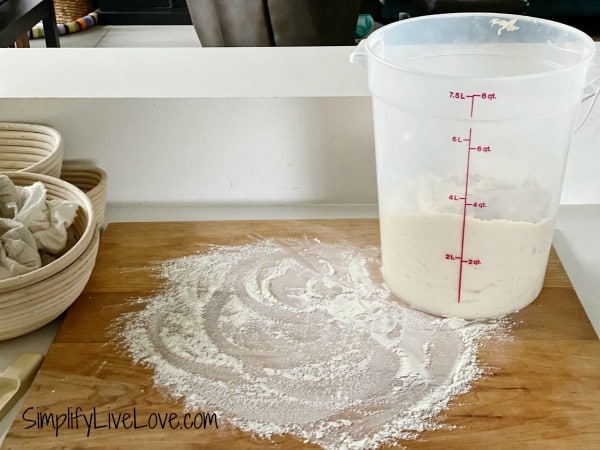
Now, it’s time to take this sticky dough out of the mixer. I put mine in a large plastic container that I grease first using a butter wrapper. I always save my butter wrappers in the fridge after removing the butter. They really come in useful for all sorts of greasing! Cover the container with a towel – don’t secure a lid unless you want exploding bread dough (ask me how I know this…). Let it rise for one hour.
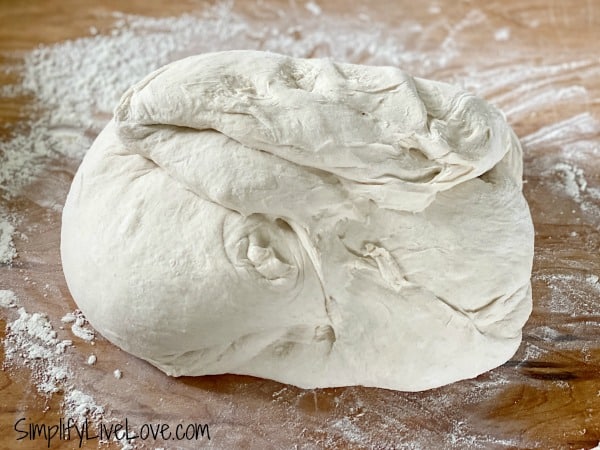
After the hour, remove the bread dough to a lightly floured surface and perform a series of letter folding by grabbing one side of the dough, pulling high, and then folding down on top of the remaining dough. Turn the dough and repeat this fold on all sides. Then put it back in the rising container, cover, and let it rise for one more hour.

After the second hour of rising, remove the bread dough to the lightly floured surface and cut the bread dough in half with a dough scraper. Gently shape it into two balls, cover with a towel, and let rest for 20 minutes.

Shaping and final rise
Now comes the fun part – shaping the dough for the final rise. This step is a little hard to explain, but essentially, you gently round the dough with the outside of our hand until it tightens up into a nice shape. Once you’re happy with the shape, put it seam side up (very important) into your final rising container.
I like to use bannetons, but you could also use a towel lined bowl if you want. A note about bannetons because there are a few ways you can use them. Most bannetons come with a cloth liner which I use as a cover. You can also use them as a liner, however, and put your dough on top of the cloth.

The benefit of putting your dough on top of the cloth is that it will come out of the banneton easier. The downside is that you don’t get those nice lines on the dough. I like the lines so I flour my bannetons first using rice flour or cornmeal, and then put the dough directly on the banneton. If I don’t flour well enough, sometimes the dough gets stuck and that messes up the final shape. We think the bread still tastes great though, even if it is misshapen.
Regardless of container you use for the final rise, cover the dough and let rise. This can take as few as 2 – 2 1/2 hours, or longer depending on the air temperature during proofing. If it’s cold, it can take longer to proof. If it’s warm, it can proof faster. You’ll know it’s ready to bake when it poofs back slowly and leaves a slight indentation after you poke it with your finger. If your bread poofs back quickly after poking it, it needs to rise longer. If it doesn’t poof back at all, you let it rise too long. Want to read more about this process? I recommend this post at True Sourdough.

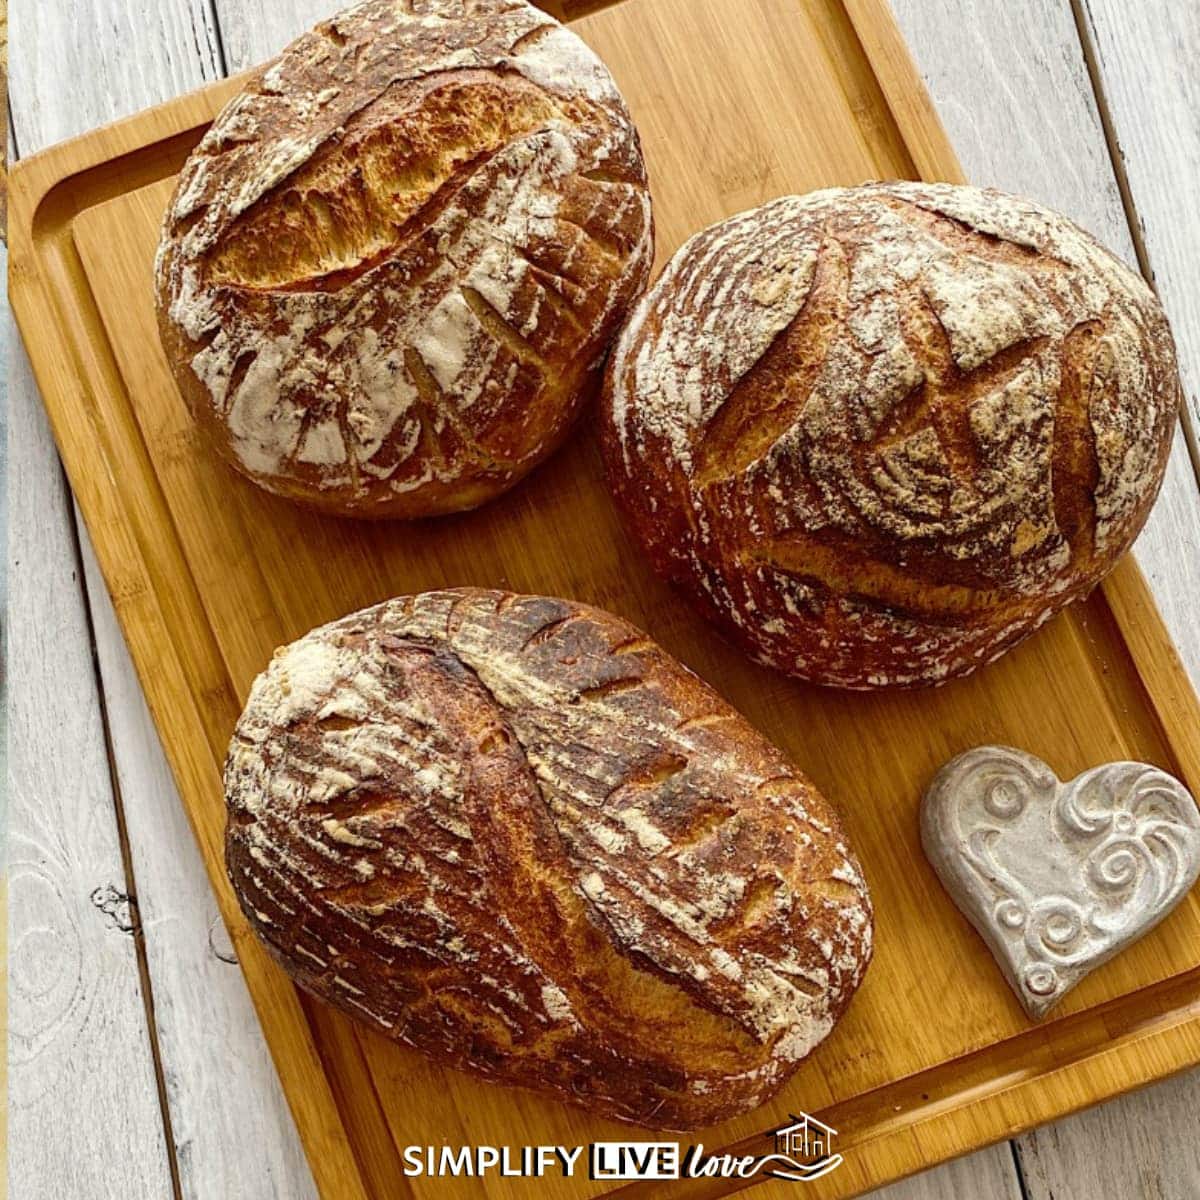
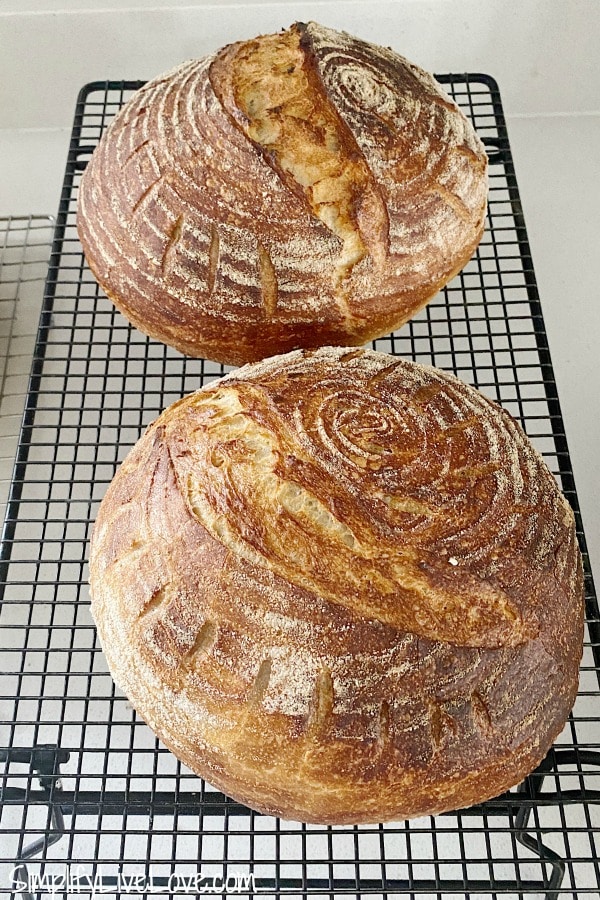
How to slash or score the bread
Right before baking, it’s time to slash, or score, the bread so it doesn’t explode out of the sides. Slashing is also a way to put pretty designs on the bread. If you’re new to slashing bread, I recommend a simple X shape or a sideways S. Using the corner of the bread lame (razor blade) not the whole blade, slash the design across the top. Then make any smaller slashes you’d like too. Now your bread is ready to bake.
The ins and outs of baking sourdough bread!
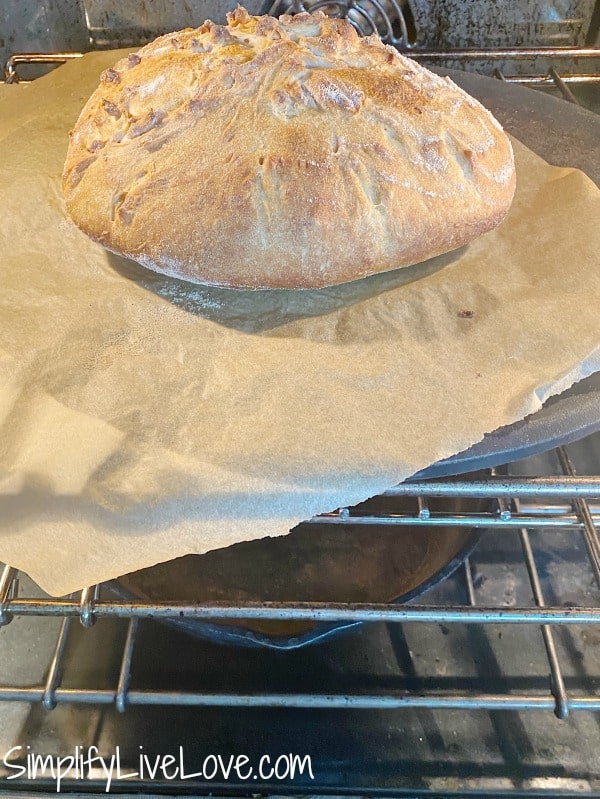
I’ve tried a lot of different baking scenarios, and this is the one that has yielded the best results for me. 45 minutes to one hour before baking, it’s time to get the oven ready. I put a cast iron pan on the very bottom rack and make sure my top rack is at the halfway point in my oven. Then I put my trusty pampered chef pizza stone on that top rack and turn my oven on to 450F. I use the Convect Bake setting, if you have one too. No big deal if you don’t.
When it’s time to bake, put the bread on the parchment paper directly on the stone, then add one cup of hot water to the cast iron skillet and quickly shut the oven door. Turn the temperature down to 425 F and bake for approximately 27 minutes, give or take a couple minutes. You’ll know the bread is ready because it is a rich brown color and the bottom will sound hollow when you tap it. If your stone is big enough, you can bake both loaves at the same time. Mine is not, so I bake them one at a time.
More Sourdough Recipes for You!
Fluffy, Flaky Sourdough Discard Biscuits
How to feed and maintain sourdough starter
Sourdough Blueberry Crumb Cake
Printable Sourdough Bread Recipe

Simple & Delicious Sourdough Bread Recipe
Ingredients
- 454 grams fed starter, about 2 cups (x2 = 4 cups, x3 = 6 cups)
- 602 grams unbleached flour, about 5 cups (x2 = 10 cups, x3 = 15 cups)
- 85 grams whole wheat flour, about 3/4 cup (x2 = 1 1/2 cups, x3 = 2 1/4 cups)
- 397 grams room temperature water, about 1 3/4 cups (x2 = 3 1/2 cups, x3 = 5 1/4 cups)
- 2 teaspoons Redmonds REAL salt
Instructions
- Combine starter, flours, and water and mix well in a stand mixer using a dough hook until a soft, sticky dough forms. Add a little more water or flour if needed. Cover dough.
- AUTOLYSE – Let dough rest for 20 minutes, then add salt. Using the same dough hook, turn on the mixer and mix well, until fully kneaded. Take the dough out of the mixer bowl and place in a greased bowl.
- Cover the dough and let rise for one hour.
- Turn the dough out onto a lightly floured surface and fold the dough like a business letter. Pull up on one side and fold over like top of an envelope. Rotate the dough 90 degrees and repeat the business fold. Cover and let rise for one more hour.
- Turn the dough out on a lightly floured surface and cut the dough in half. Gently shape the dough into two round shapes, cover, and let rest for 20 minutes.
- At the end of this rest period, form your shapes into tight balls and then place seam side up in two towel lined bowls or in lightly floured bannetons. Let rise for 2 to 2 1/2 hours, until light and airy.
- 45 minutes to 1 hour before you’d like to bake, preheat oven to 450F. Preheat a pizza stone on a middle rack and include a cast iron skilled on the bottom rack.
- Before baking, carefully turn the bread out of the banneton onto a piece of parchment paper. Slash or score your bread so it won’t erupt during baking.
- Place the bread on the preheated stone, quickly pour one cup hot water into the skillet, and shut the door.
- Turn the temperature down to 425 F. Bake for 27-30 minutes.
- Store any leftover bread in a loose bag at room temperature for about a day to prevent moisture buildup. You can also wrap tightly and freeze for another day.
Notes
Nutrition
Let me know what you think about this recipe! How’s your sourdough baking going?


Great step by step directions! I’m baking my first loaf now! I wondered if you had used a cast iron pot? If so, what would be the directions for this? Thanks for all your tips! I really appreciate it!
My daughter and I decided we were going to make sourdough bread. We got a dehydrated starter from Lucy at Holy Roller and fed it for a few weeks then found this recipe to use our starter. All I can say is it was delicious and very easy. Your step by step instructions were spot on and the loaves turned out beautiful and delicious. Thank you, can’t wait to do it again.
So glad it was helpful! Thank you for letting me know. <3
Can u make this without a free standing mixer ? I don’t have one