How to Make Strong & Effective Tomato Cages – DIY Tutorial
on Jun 29, 2015, Updated Jul 29, 2023
This post may contain affiliate links. Please read our disclosure policy.
Do you have a problem with the wimpy tomato cages they sell at the store? I have a DIY Tutorial for you to make strong and effective tomato cages for you today.

I love growing tomatoes. The taste, the smell, the delicious home canned goodness that lasts all year! There’s not much better than a delicious homegrown tomato. Expect one thing – I hate containing the plants. I battle the tomatoes in my garden every single year and usually end up with a huge mess of a tomato jungle. Nothing works to contain my plants. I’ve tried hog panels, steel fence posts, and wimpy, expensive store-bought tomato cages. The hog panels and steel fence posts require too much maintenance.

Who wants to spend hours tying up tomato plants? NO, THANK YOU! And those store-bought tomato cages? What a waste of money. They don’t last the season in my garden. They’re fine when the tomato plants are small, but my tomatoes grow and grow and grow! And then those stupid cages break and irritate me because my tomatoes fall over and I’m left with more trash. Each year, I think, this will be the summer that I finally do a good job containing my tomatoes. But it never is. I always end the year with a mess of tomatoes that sprawl all over the ground, and a bunch of squished, wasted tomatoes because I have to step all over them to pick.

Last year, when my dad showed me how he used wire fencing to make useful cages for his tomatoes, I had an aha moment. And then when he even brought his left-over fencing to Iowa for me to have, I really had no excuse. I thought making those tomato cages would be the perfect thing to do over the long winter, but that never happened. Here it is, already almost July, and I have FINALLY finished my ultimate tomato cage – strong, cheap, and relatively easy to make. Here’s how you can get your tomatoes under control too.
How to Make Strong & Effective Tomato Cages – DIY Tutorial
The Materials
- Wire fencing, 8 feet per basket. The holes in my fencing are 6″ wide by 2″ tall – that seems to be a good size to get hands in and out for ease of picking.
- Wire cutters
- Good shoes
- Gloves
The Process

Really, the process is very easy. Simply roll out the fencing, measure out 8′ which was 16 squares on the fencing I used, and cut with the wire cutters. It does help measure if your kids play chalk tic-tac-toe beforehand, by the way. 😀 After we figured out that each cage needed 16 squares, I didn’t even have to measure the pieces. Just count to 16 and cut. Rolling out the fencing is a little tricky because the wire wants to bend and snap back at you And it’s sharp, too! Make sure you wear good shoes or you end up with bloody toenails. Go ahead and ask me how I know this! Grrrrr.
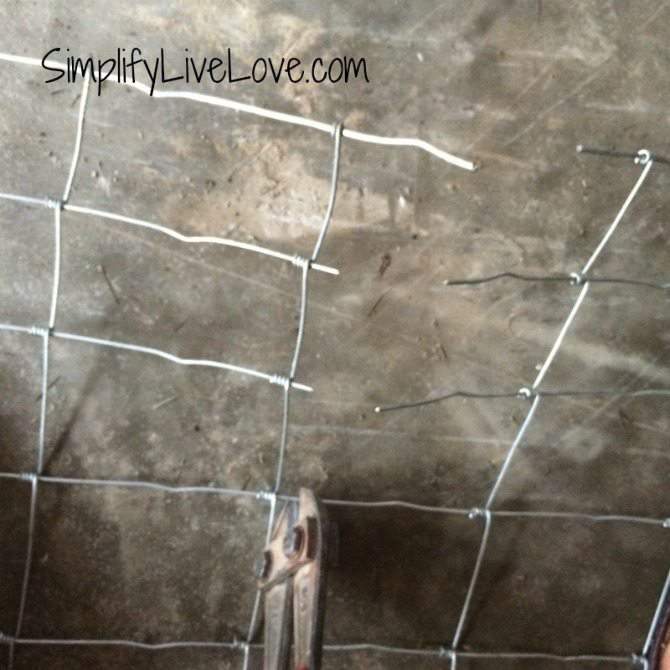
Cutting is easy. Just cut close to the end of the last square with good wire cutters – remember it was 16 squares for each of my cages but might be different for you if you buy different sized fencing. Each square on my fencing is 6″ wide. If you cut near the end of the last square, the beginning of the fence has a longish piece of wire and the part you just cut has not much wire left sticking out at all.
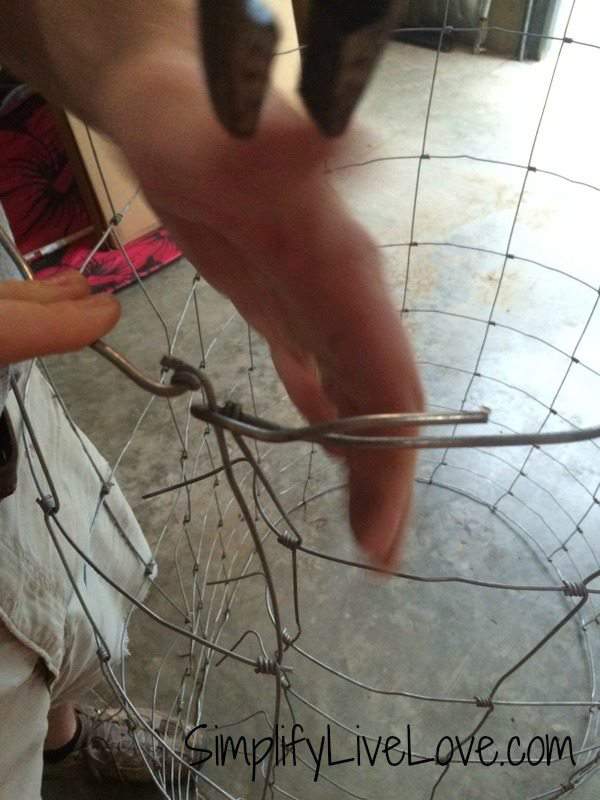
Once the fencing is cut, simply line the sides up together, and twist the long piece of wire over the top of the first square on the other side. You can use pliers or your hands, but make sure you wear gloves, or you end up with cuts all over your hands. Those cuts hurt a lot when you get lemon juice on them. It’s just not worth the pain – much smarter to wear gloves! 😉

After you’ve twisted each piece of wire down the entire tomato cage, you’re done!

Fill up your garden with homemade tomato cages and be proud of your effort. Now the tomatoes can grow as big as they want, and this sucker will keep them where they need to be.
The only downside to these tomato baskets is storing them over the winter. I have an empty silo I plan to put mine in, but you’ll need to consider storage when you decide to make them. They sure do take up a lot of room.
And that’s it! No more wimpy tomato cages in my Iowa garden.
Once you get a bumper tomato crop, here are some things to do with them:
Easy, Homemade Roasted Tomato Sauce
How do you contain your tomatoes? I’d love to hear what works for you.


A job well done!
What a great idea Michelle! I’m showing this to the hubby and hopefully he’ll make me a few. 🙂
Something we do that makes them even stronger – cut off the bottom ring of wire, that gives you some vertical stakes to push into the ground to help hold the cage upright in strong winds.
That’s a great suggestion! You could also add a stake though the wire too. My cages have been through really strong wind and haven’t moved, but I’m curious to see how they fare once the tomatoes get huge! 🙂
They look great!
I’ve used left over rewire from concrete jobs for years. Recently I’ve started using plastic zip ties to told them together. At the end of the growing season just cut the ties and store one inside the other to make one stack in shed. I also use tent stakes found at rummage sales to stake to ground, along with bent over stakes from left over re bar.